Input Your Smart Data & Manage Your Church Info
While most of the content you create for your website will be handled directly within Nucleus Web, there are a few pieces of information that will be handled in your Nucleus Church Settings. This is because this information can be used in multiple products, not just Nucleus Web.
So when creating your website, be sure you also check out your Church Info under your Church Settings and make sure everything there is up to date.
In this guide, we'll cover the following topics. Click on any one to jump ahead.
- What Is Smart Data?
- Create & Manage Your Leaders
- Manage Your Connection Types
- Review & Update Your Church Info
What Is Smart Data?
Imagine: you’ve been asked to update some information on your church’s website, such as a church leader's contact information, only to forget that the information exists in multiple places on the website. Don’t worry, we’ve all been there.
Nucleus Web is designed to help avoid those instances, and make updating critical pieces of information on your website easier and less cumbersome.
That’s where Smart Data comes into play. Instead of worrying about having to update the multiple places where one piece of information exists on your website, you can add content in one centralized location in your Nucleus Dashboard, and then Nucleus Web will update that across your website, anywhere that information has been shared.
Whenever you make updates to that content in the one centralized location in your Nucleus Dashboard, that information will automatically and dynamically be updated throughout your website! Pretty neat, eh? 😎
Right now, the only Smart Data that exists in Nucleus is Leaders & Staff. (We’ll explore that below.) Church Name, current year, first and last name.
We have other ideas of what could be considered Smart Data. But if you have any ideas of your own, let us know! hello@nucleus.church
And while we’re focusing on Smart Data in the context of Nucleus Web, we’re hoping that other Nucleus products to pull from this Smart Data to be utilized in other contexts as well.
Pretty exciting stuff! But let’s take a look at what currently exists 👇
Create & Manage Your Leaders
While you might not realize it, your Leaders & Staff page is one of the most visited pages on your website. Who you have on as staff, volunteers, and leaders can say a lot about your church.
In other words, your Leaders & Staff page is very important. So best be sure not to make it an afterthought 😉
Add A New Leader
To add a new Leader, first, go to People. Then, click on Leaders & Staff. Click here for a quick link.
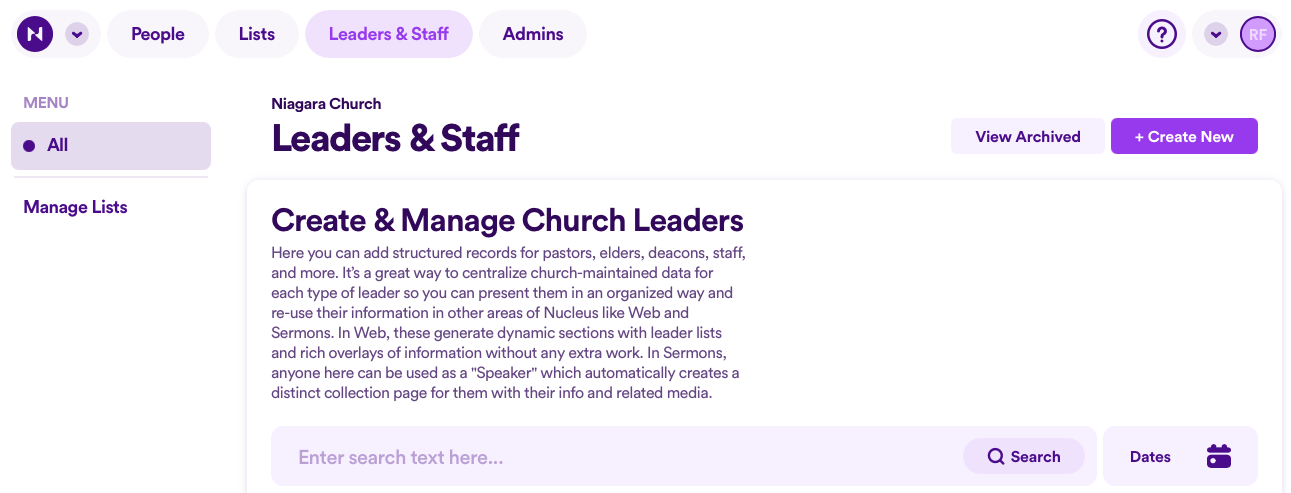
Next, click + Create New.

Here, you can add a bunch of information about your leader/staff. To start, enter the person’s basic profile information:
- Prefix (optional)
- First name
- Middle name or initial
- Last name
- Suffix (optional)
- Job, position, or role

Next, you can upload up to 3 images, with the first one being the only mandatory image:
- Headshot / primary image
- Alt image (this is a great place to upload a funny/silly photo of them 🥸)
- Family photo

Below this, you can then write a short bio, and then a longer one. Writing both the short and long versions can be helpful to give visitors to your website a quick glance at who each Leader & Staff member is, and then if they want to learn more, they can read the longer version.

Below this, you can add various pieces of contact information, ranging from email to phone numbers to social media.

Note: Whatever contact information is shared here can be made public on your website, so make sure you don’t accidentally add someone’s information they don’t want just anybody to have access to from your website.
Once you’ve added all the information you need, click Save & Add Now.
Add Leaders To A List
You can add this leader/staff member to a specific list. This can be helpful if you have a larger staff, where you have multiple people who make up a single team (e.g. Children’s Ministry, Admin, Elders, Board Members, etc.)
From there, you can tell Nucleus Web to pull information from a specific list, and it will automatically pull the leaders/staff from that list to populate that section on your website, rather than having to select each person individually.
To create a list, click Manage Lists in the left sidebar. Then click + Create New.

Give your list a name/label, a short description, and then add an image to go along with it.
Then, click Add New List.
Now that you have a list created, go back to All in the left sidebar.
You can then click the down arrow on the leader you just created, select Add to List, and then choose the list you just created.

You can view who’s already added to a specific list by clicking the list’s name in the left sidebar.

Manage Your Leaders
When viewing your leaders, you can use the Search Bar to search for a person’s name or title/role.

You can also use the Date Filter to showcase leaders between a created date and last updated date.

Clicking the down arrow on a leader, you can View & Edit the leader, you can Add to List, or you can Archive the leader.

To view your archived leaders, click View Archived. And vice versa, to view your current list of leaders, click View Unarchived.

Manage Your Connection Types
If you’re coming from our previous guide on how to Understand Nucleus Web Privacy Options, you might already be a bit familiar with Connection Types. (If you haven’t yet read that over, we highly recommend doing that before managing your Connection Types.)
While Connection Types extend far beyond just Nucleus Web, Connection Types are what enable private pages on your website to work. When you set a page to private, you choose what Connection Type(s) people need to have on their profile in order to view the contents on the page.

When people try to access that private page, they need to first log in, and then the Connection Type associated with their profile needs to match the allowed Connection Types to view that page.

To find your Connection Types, first click in the top left dropdown menu and select Church Settings. From there, click on Church Info and select Connection Types. Click here for a quick link.

If this is your first time viewing your Connection Types, you’ll notice there are 3 types already established:
- Members
- Regular attenders
- Visitors
That’s because these are likely the 3 most common types of connections people can have with your church. But these are just a starting point. You are more than welcome to rename these, delete them, or create new ones.
Note: Before you rename or delete any Connection Types, make sure you communicate with all other admins on the account. Connection Types are integral to privacy controls of other products (like Prayer and Flows), and are also integrated into Audiences with Nucleus Messages. So if you’ve already established any of your other Nucleus products, check with all other admins before making any changes to the Connection Types that currently exist.
To add a new Connection Type, click + Add New Connection.
Next, add a name and a description. Then click Save Changes.

Clicking on the down arrow of a Connection Type, you can rename it or change its description by clicking Edit Connection.
You can also select Delete Connection.

Because of how serious it could be to remove a Connection Type (there are no archived Connection Types, so once it’s deleted, it’s deleted for good), there will be a warning to read. And then you’ll be required to type in DELETE (all in capital letters) and then click Delete Now.

Now, that’s how you can add/manage your Connection Types. But in order for someone to have a specific Connection Type associated with their profile, an admin needs to manually add one to their profile.
How does an admin do this? Great question! To learn how to do that, as well as how Connection Types and how they are integrated in other Nucleus products, click here.
Review & Update Your Church Info
Lastly, it’s always good to review your basic church’s information. Some products utilize your church’s profile information (like your church’s name and address) when sending email receipts to people when they complete a Flow (whether from the PrayerFlow, GivingFlow, or another custom Flow).
Most of this information, you would have already filled out when you initially created your church’s Nucleus account. But there could be some important missing details (like your church’s time zone!) that you might still need to add.
To find your church’s Profile, first click in the top left dropdown menu and select Church Settings. From there, click on Church Info and select Profile. Click here for a quick link.

For your church’s primary name (that’s the DBA - doing business as - name), make sure this is actually your church’s name. (You wouldn’t believe how many people enter their own personal name when answering this question in the initial survey 😅)
For your church’s phone number, don’t worry about adding any brackets or hyphens. Nucleus will add those for you.
For your church’s mailing address, as soon as you start typing in the street address field, Nucleus will generate some suggested addresses.

If you see yours, click on it, and Nucleus will auto-fill the rest of the details for you. If you don’t see your church’s address suggested, keep typing. While Nucleus does its best, it’s possible your address won’t come up. If that’s you, you’ll just have to fill out the rest of the address details manually.
Further below, you can find the time zone that your church is located in. While this may seem inconsequential, this is extremely important to add to your profile if you’re utilizing any Nucleus product where people can submit information.

This includes Nucleus Prayer, Nucleus Giving, and Nucleus Flows. The time displayed for those submissions in your Dashboard will be directly tied to the time zone you input here.
Lastly, if you haven’t done so already, fill in the approximate size of your church congregation.

This is helpful information for our team here at Nucleus to know the various church sizes we help to serve 😊 (It’s also taken into account for your Nucleus Giving pricing tier.)
If you need to edit any of your profile information, don’t forget to click the Save Changes button below after updating.

What Next?
Now that you’ve got your Smart Data and church profile information all sorted out and up to date, it’s time for the fun to begin: creating the rest of your website 😍 Below are some other guides to bring you up to speed: